Connect to a Samba share from OS X

Here on Ghacks I've worked to cover Samba from numerous angles (check out the Samba Topic on Ghacks). I want to build on that topic by helping you to connect to a Samba share from within the OS X operating system. And just in case your Samba install is not set up, or just not quite right, I will offer up an easy to use smb.conf file that should help you get things rolling.
For this installation I will using Samba on a Debian server. Nothing really special, but it is on a fairly secure internal network (So I won't really touch on security in this article). With that said, let's begin.
smb.conf
First let me show you a simple, easy to use, smb.conf file. This file should be placed in /etc/samba/ AFTER you back up your current /etc/samba/smb.conf file with the command cp /etc/samba/smb.conf /etc/samba/smb.conf.bak. Once you have that done, open up /etc/samba/smb.conf, delete the contents of that file, and insert the following:
[global]
netbios name = NETBIOS_NAME
workgroup = WORKGROUP
security = user
encrypt passwords = yes
smb passwd file = /etc/samba/smbpasswd
interfaces = 192.168.1.1/8
[SHARE]

comment = COMMENT

path = /PATH/TO/SHARE

writeable = yes

create mode = 0750

locking = yes
Where everything in BOLD is user/network specific.
Passwords and users
Now of course you have to add users and add passwords for them. Do the following:
sudo smbpasswd -L -a USERNAME
Where USERNAME is the actual name of the user you want to add. You will be prompted to create a password and retype said password.
Now enable the user with the command:
sudo smbpasswd -L -e USERNAME
Again, where USERNAME is the actual user name you want to add.
Now restart Samba with the command:
/etc/init.d/samba restart
Connect from OS X
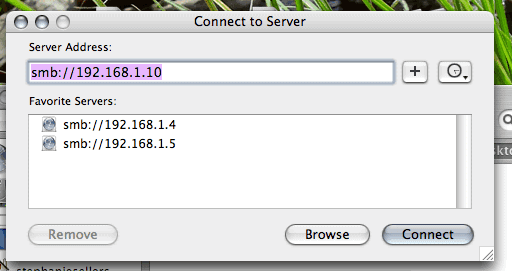
And now to the heart of the matter. How do you connect to your Samba server from OS X? Here's how. The first step is to open up the Finder. Once the finder window is open click the <Apple>k key combination which will bring up the window you see in Figure 1.
If this is your first time to connect to this Samba server from your Mac, you won't see the servers listed...you will have to manually enter them. As you can see, in Figure 1, the address to enter is in the form: smb://IP_ADDRESS_OF_SERVER.
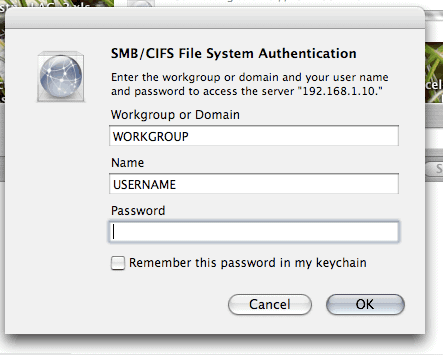
Once you enter the IP address hit the Connect button and you will be prompted to select the SMB/CIFS share you want to connect to. After you do this the authentication window will open (see Figure 2). In this window you will be required to enter the Samba credentials for the Samba server.
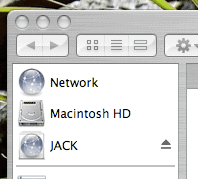
Upon authentication to the Samba Server the Share will mount and appear in your Finder as you see in Figure 3 (only the share name will be different). You can now navigate this share as you would any folder.
Disconnecting from the share
Once you are finished using the share you can unmount the share by clicking the upward pointing arrow associated with the share listing in Finder. Of course you can leave this share mounted until you reboot the machine. I would suggest umounting the share before your reboot or shutdown.
Final thoughts
Mac and Linux do play well together. Hopefully you have found connecting to a Samba server as simple as nearly any other task in OS X.
Advertisement