A few cool plugins for The GIMP (and how to add them)

One of the many nicer aspects of the GIMP (GNU Image Manipulation Project) is that, like Photoshop, you can extend it's usability by adding plug-ins and scripts. These plug-ins are quite numerous (and can be found on the GIMP Plug-in Registry). Not only can you find plug-ins, you can also find perl, script-fu, and python scripts for The GIMP. These plugins (and scripts) range from the general to the very specific. In this article I am going to highlight a few of these plugins as well as show you how to install them. Â NOTE: These plugins do work with GIMP for both Windows and Mac.
Which version?
The version of The GIMP you are using will matter. If you open up GIMP click on the Help menu and select About. A new window will open informing you which version you are using. I am running 2.6.8. If you can, update your version to the latest so this article will make better sense (and you're not having to convert from the old style of 2.4.)
Fortunately you won't have to do anything extra with GIMP - you only have to download the plug-ins you want, place them in the proper directory, and restart GIMP. That's it. Of course, after you've restarted the application, it is some times a matter of locating the plugins.
Where to place the pulg-ins
I will assume you are using GIMP in Linux. That being the case you will find a directory in your ~/ directory called .gimp-XXX (where XXX is the release number). In my case I am looking at ~/.gimp-2.6. Within that directory you will find two different subdirectories that will house most of your plugins:
- plug-ins: If the file is a uncompresses as a directory, it will be unpacked and placed here.
- scripts: If the file has an .scm extension (or compressed archive contains an .scm file), it will go in here.
Now that you know where these directories are, let's take a look at a few plugins you might like.
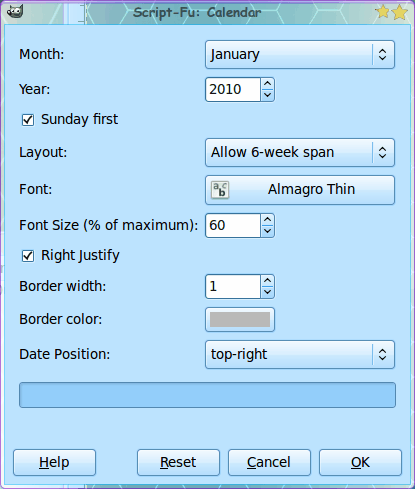
This simple plugin will take an image you have and render a month calendar on top of it. This script-fu is installed into ~/.gimp-XXX/scripts and will be found in the Filters > Render menu. When you open up the tool you will see a fairly straight-forward window (see Figure 1).
To create a calendar follow these steps:
1) Open up the image you want to lay the calendar over.
2) Click the Filters > Render menu path and select Calendar.
3) Configure the calendar how you want it.
4) Click OK and watch the calendar render.
You can then print out your calendar and use it as desired.
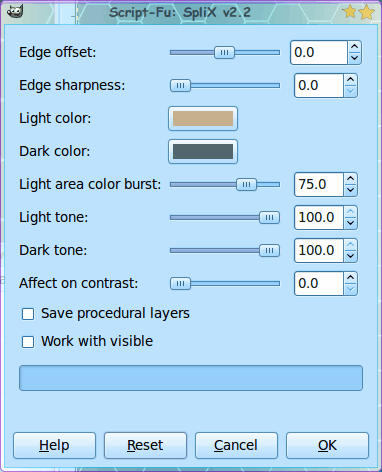
If you are into gray-scale or sepia tone images, Splix is right up your alley. What you can do with this plugin is take an image and remap the colors to a lighter and a darker color. This is great for when you want to make a sepia tone image with different tones. To install this plug-in move the *scm file to the scripts directory and restart GIMP. To use Splix simply:
1) Open up the image you want to manipulate.
2 ) Go to the Filters > Red Storm FX menu and select Splix.
3) Manipulate the controls as you see fit (see Figure 2).
4) Click OK.
Your image will now be re-rendered in the two tones you selected.
RSS Lightsaber

This one is a lot of fun. Add a lightsaber effect to any image. Figure 3 shows a simple before and after of an image. This script is installed into the scripts directory (even though it downloads as a tar file - it contains documentation). So you will download hte file, unpack it, and move the *scm file to the scripts directory.
To use RSS Lightsaber open up the image you want to manipulate and follow these instructions:
1) Add a new layered (call it Blade Layer).
2) Create the "sabers" using the drawing tool (they MUST be white).
3) Remain within the Blade Layer and go to the Filters > Red Storm FX menu and select RSS Lightsaber.
4) Select the core size, glow size, and glow color and select OK.
Your image will not be rendered with beautiful light saber effects.
Final thoughts
There are quite a lot of filters to be found within the repository. I will revisit this topic as I find cool or useful plugins/scripts later on. If you've come across a nifty script, let your fellow Ghacks readers know.


Thanks for the nice tut, Jack. More articles on how to make use of for instance Photoshop plug-ins in GIMP would also be appreciated.
@Pejeno: Try and search for GIMP portable “photoshop” interface, you might like that one better. Compatible with non-portable versions as well.
I can’t wait for the single window interface version to be released.
Gimp rocks, I just don’t like it’s current interface.
@HNicolai, Gimp supports scaling an image by drag and drop using the Scale Tool Icon, see http://docs.gimp.org/en/gimp-tool-scale.html
The link for Splix is wrong, should be:
http://registry.gimp.org/node/21370
Do you know any plugin so you can resize the picture like in MS Paint? I really hate “crop” the picture by typing how many pixels I want more/less… I like the MS Paint way, where you just “drag’n’drop” the corner of the picture and then it get’s a new size.
Hope you understand what I mean, and thanks for the good advice/tips you post about Linux :)