Feed your inner chef with Gourmet Recipe Manager

My wife is a really good cook and baker. So much so that I have been trying to find the perfect recipe manager to fit her needs. This software needs to be able to import files from web sites, create personal recipes, automatically adjust a recipe ingrediants to match serving size, and have an easy to use interface.
The Gormet Recipe Manager is one such tool that comes very, very close to hitting this nail on the head. And although this tool has features my wife will never use (such as regular expression searching), I think it might be one that needs a real cool to kick the tires. But from a geek stand-point, the software is pretty good. In this tutorial you will see how GRM is installed and how you can add recipes from supported web site formats.
Features
The Gourmet Recipe Manager offers the following features:
- Searching and sorting.
- Easy to use GUI
- Simple recipe editing.
- Importing and exporting.
- Recipe rating.
- Shopping list creator/organizer.
Gormet can also import the following formats:
- Mealmaster files
- Rich Text Format
- Plain Text
- Recipe Web Pages
- Gourmet XML files
What more do you need in a recipe manager? Now let's take a look at the simple installation.
Installation
As you can probably gues, the installation is the SOP (Standard Operating Procedure):
- Open your Add/Remove Software utility.
- Search for "gourmet".
- Mark Gourmet Recipe Manager for installation.
- Click Apply.
Watch the installation magic happen.
Once installed, you will find the menu entry in the Accessories sub-menu of the Applications menu. Let's fire this baby up.
Using GRM

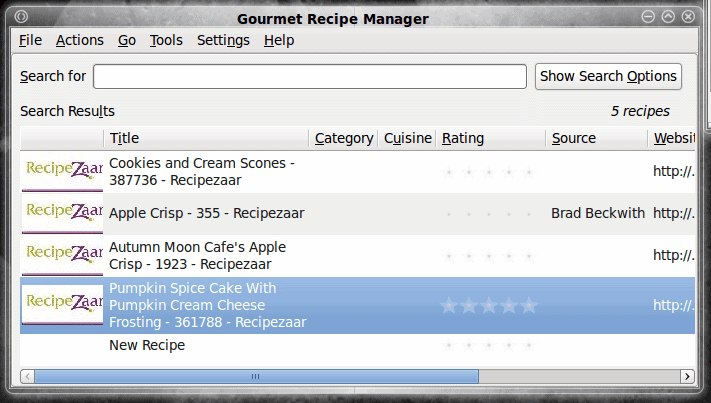
Obviously the first thing you will want to do is add a recipe. This is quite simple. From the main window (see Figure 1) click on the File menu and select New. Don't expect any sort of wizard here. What you will find is a single window that allows you to input all of the information for your recipe that you need. Of note during recipe input is that the Instructions and the Notes are free-form. You can do some formatting, but nothing really detailed.

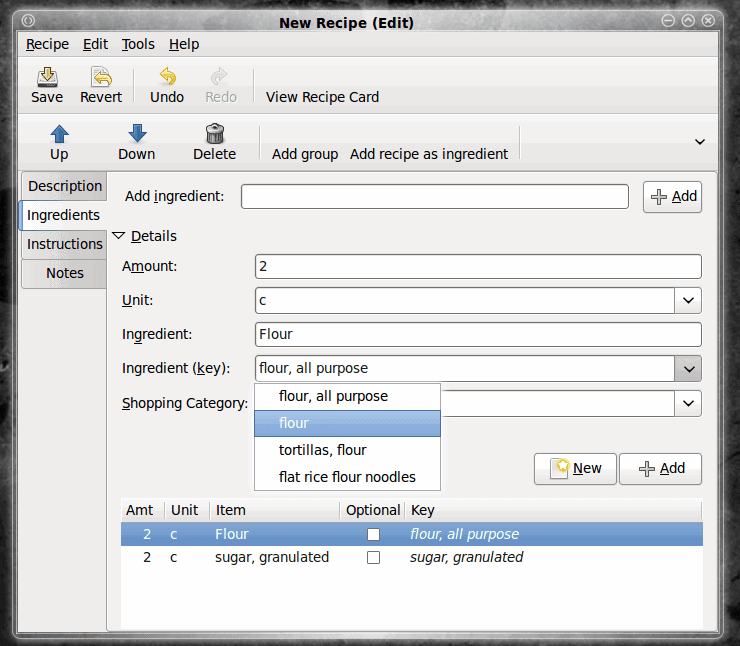
You will find adding recipe ingredients allows you to go into quite a bit of detail. Instead of just adding text to a list of ingredients, the input has a bit of intelligence. Say, for example, if you are adding Flour. When you enter Flour as your ingredient you will notice the Ingredient key will modify to allow you to select from specific types of flour from a drop down list (see Figure 2).
Once you have completed your recipe make sure you click the Save button or the recipe will not be added to the database.
And finally, when your recipe is completed you can open it back up from the main window and click the Shop button where you can view and print out the items you need to purchase.
Importing recipe from web site
Let's take a look at how you import recipes from a web site. The best place to grab recipes from is the RecipeZaar. I will warn you though, there is some formatting that needs to be done with these recipes. However, once you get the hang of it, this site can really be a boon too chefs.

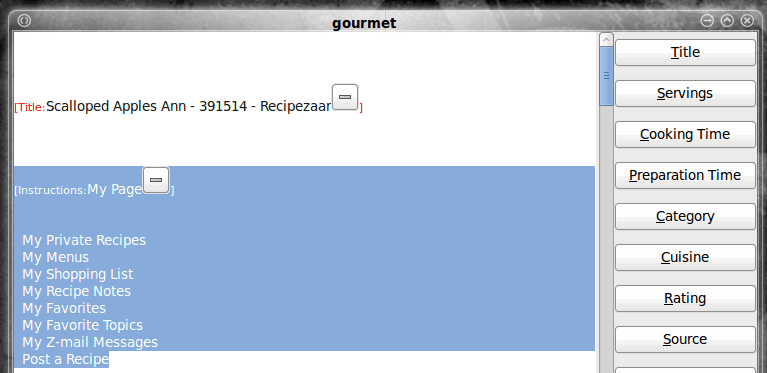
To import a recipe from a web site go to the File menu (on the main window) and select Import From Webpage. A small window will open where you will enter the URL to the recipe you want to import. On the RecipeZaar site you will want to go to the actual page of the recipe you want to import and copy that full URL. Once you have done this click OK to import the page. When the import is complete you will have a new window that resembles Figure 3. Here's the trick to this - on a site like RecipeZaar an imported recipe will include a bunch of items you do not need. So go through each imported recipe and delete the items like:
- My Page
- My Cookbooks
- My Account
etc.

You'll see exactly what I mean. But in order to delete the items you need to click the "Reveal hidden text" button to show you the text you are not seeing. Figure 4 shows revealed text (that is also highlighted for deletion).
Once you have all of the unecessary text deleted (anything in red can not be deleted) click the OK and finalize the recipe by selecting an image to go along with the recipe.
Don't worry though, if a recipe is a jumbled mess, or you know something is wrong, you can change this by clicking the Edit Descrption button when viewing the recipe.
Final thoughts
It's not perfect, but Gormet Recipe Manager has a lot of promise. If this tool can actually make my wife's job easier, then I have certainly found a winner.


Hi ,
is there any possibility to delete all recipes in windows installation .
Thanks in advance
Keerthi
@goh mifune: have you tried krecipes yet? it’s actually a pretty good entry in this category.
Please let us know if there is another option, or a solid KDE 4. Dependancy issues require me to sacrifice miro and Anki, which just isn’t happening.