Install VirtualBox Guest Additions for Windows 7
You may have read my series on VirtualBox virtual machine manager. If not, here it is:
Installing and configuring VirtualBox for virtual OSes.
Installing Windows XP as a virtual machine in VirtualBox.
Install Guest Additions for a better VirtualBox experience.
A new way of thinking thanks to virtual machines.
Although the Guest Additions tool has been covered already, if you've tried using Windows 7 in VirtualBox you will have most likely encountered some issues.
The main issue is that Guest Additions isn't supported. That doesn't mean it can not be installed. It can, you just have to trick Windows 7 in order to do so. In this article I will show you just how to do so.
The basic installation
The first thing you need to do is get Windows 7 installed as a virtual machine. You can follow the directions for installing Windows XP. The only difference will be selecting the version of Windows you will be installing. Even though Windows 7 is not yet officially supported, there is an entry for the latest Microsoft OS in the dropdown.
After Windows 7 is installed you might notice (depending upon your hardware) that you can not see the task bar. This is because, without the Guest Additions, VirtualBox can not handle the proper resolution for Windows 7. So, it's obvious you will need this tool.
The trick
The trick for installing Guest Additions in Window 7 is to trick it into thinking it's being installed in Vista. While Vista is running click on the Devices menu and select Install Guest Additions. You will go through the same steps as you would for installing the Guest Additions on Windows XP at this point. The difference is the actual installer won't start up. This is where it gets a bit tricky.
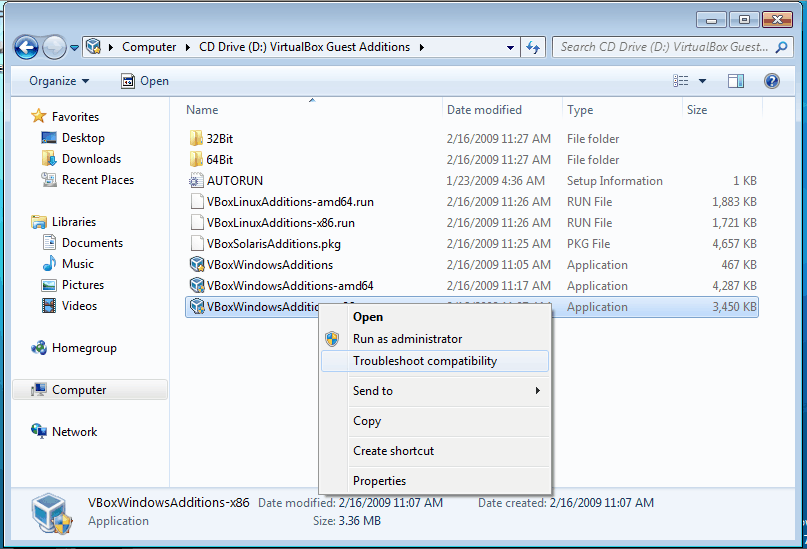
The process of installing the Guest Additions will have downloaded a mountable file on your system. If you click on the Windows 7 Start Menu and then click on Computer you will see that file listed along with Local Disk and Floppy Drive (even if you don't have a floppy drive). Right click the VirtualBox Guest Additions entry (it will probably be labeled as "D") and select Open.
In the resulting window you will see a number of files. Among these files you will see listed entries for both x86 and 64bit. These files are called:
VBoxWindowsAdditions-amd64
VBoxWindowsAdditions-x86
Which file you use will depend upon what hardware you are using. Right click the one you want to use and select Troubleshoot Compatibility (see Figure 1). This will walk you through a Wizard that will attempt to solve the problem. Most likely it won't, so you will have to do so manually. When the wizard has finished you will have two options: Try Recommended Settings and Troubleshoot Program. Select Troubleshoot Program and then, in the new window, select the first entry which is
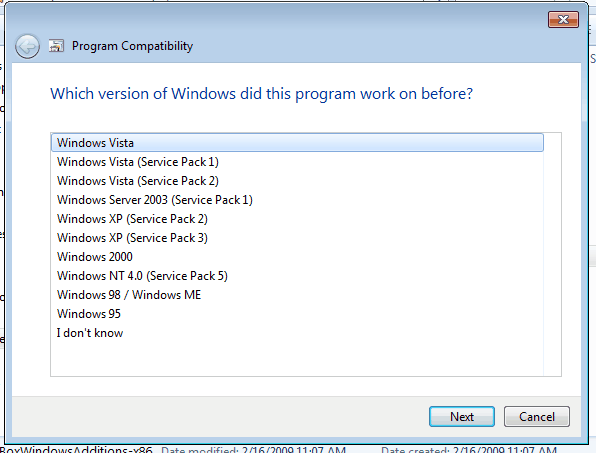
"The program worked in earlier versions of Windows but won't install or run now." After you select this option click the Next button and then select Vista from the list (see Figure 2). Once you have selected that option click Next and then, in the resulting window, click the "Start the Program" button. This will actually start the process of installing the Guest Additions for Windows 7. You can now finish this install as you would any other.
Final thoughts
I am confident when Windows 7 is finally released this process won't be necessary. But if you need to test out Windows 7 now, this is the way to go.





thanks so much! i’m getting more and more into virtual box everytime someone like you makes it so simple
worked for me – thanks
I actually found the problem of the tools bar, which is not showed up.
But you can call with HOST+D the launch of the VB GuestAdditions instalation. After installing everything went ok.
“Mike says:
July 30, 2009 at 9:52 pm
For me it also worked with the beta and the latest version of Virtualbo.”
Indeed… this article is a complete waste of time. Something’s wrong with the author, not VirtualBox or Win7.
Oh, and aside from that, I don’t understand the point of this story. At all.
I’m running Virtual Box. Latest version, 3.02. Installed Win7 RC on it about a week ago, and had zero problems installing the guest additions. No workarounds, no hacks, it just worked.
Sounds more to me like somebody didn’t know what they were doing on their install and decided to write a story about it.
For me it also worked with the beta and the latest version of Virtualbo.
“The trick for installing Guest Additions in Window 7 is to trick it into thinking it’s being installed in Vista. While Vista is running click on the Devices menu and select Install Guest Additions.”
Typo? “While Vista is running”? Aren’t we in Windows 7 in the VM here?
inthewayboy: that’s great news. but for those of us who only have a beta of 7 – this is most likely necessary. i had to do this for the most recent version of VirtualBox – but it was a beta release of Windows 7. i’m assuming it is because you are not using a beta.
Installing Windows 7 x64 RTM on VIrtualBox 3.0.2 required no compatibility configuration…looks like they got it licked!