Create message filters in Claws Mail

You may have read my recent article about Claws Mail ("Claws Mail: The unsung powerhouse email client."). If you've given it a try you will have noticed just how powerful that email client is. It has a ton of features, and allows for some pretty serious power-user-friendly options.
One of the aspects of Claws Mail that I like more than that of either Thunderbird or Evolution, is the filter tool. I am sure you know that email filters are one of the best means to manage the enormous amount of email coming down the pipe. You can keep SPAM in the trash, filter specific email to specific folders, and take just about any kind of action you need/want.
For many, the Claws Mail filters might not be as simple to use as the standard fare. But that doesn't mean they shouldn't be used. With this tool, it is just a matter of getting used to a different interface. And that is what this article will help you with.
The tools
There are two ways to create a filter with Claws mail: The easy, less configurable method, or the harder, more configurable method. I will only briefly mention the easy method as that is, well, easy. The second, harder, method is what we will primarily focus on.
The easy method
If you have an email selected, click on the Tools menu and then select "Create Filter Rule". When this new sub-menu pops up you will see four entries:
- Automatically
- By From
- By To
- By Subject
That will define the condition of the filter automatically for you. You will still have to configure the rest of the filter, but this step automates a portion of the creation.
Now let's take a look at the full creation of a filter by doing things the hard way. I shouldn't scare you off by saying "hard way"...it's not really that difficult.
Filter from scratch

When you go to the Configuration menu you will see the Filtering entry. Click that to open up the Filters window (see Figure 1).
As you can see, for the most part, creating a filter is simple. The only aspect that might not be as user-friendly as you are used to is the Conditions and Actions. For these what you have to do is is click the associated Define buttons. When you do this you will configure the specifics of either the conditions or the action of the filter. Let's take a look at configuring the conditions of a filter. Click the Define button associated with the Conditions. When you do this a new window will open up.
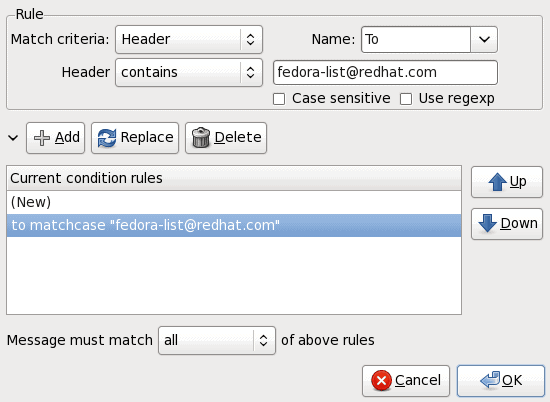
Figure 2 shows a condition already created. What you can not see, from the image, are the included options in the drop down lists. With different types of filters you will have different drop down lists available. The different types of criteria you can select include: Header, Age, Phrase, Flag, Color lables, etc. Say you select the Header from Match Criteria. When you do you can then select:
Name: From this drop down you can then select such familiar items as To, From, Reply To, etc.
Header: This is where you decide if your header Contains or Doesn't Contain. Basically this is a positive or negative match.
Once you have your condition rule set you then click the Add button. If you want you can then create more rules for this one condition. Each condition can have multiple rules and you can move the rules up or down in the chain of command. You can also configure if the rule must meet all or at least one of the rules.
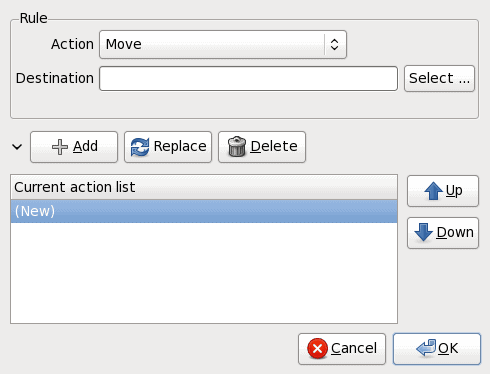
When you are finished with your Condution click OK and it is set. You are now ready to define your Action. Click the Define button associated with Action which will open up a new window (see Figure 3).
This is the easier portion of the setup. What you do is select what action you want to take from the Action dropdown and then select the associated sub-action. The associated action will depend upon which Action you choose. For instance, if you select to Move the mail you will then have to select the Destination folder. If you want to flag the message you will have to select how you want it flagged.
Once you have completed this section click OK. Now, before you finalize the new Filter you have to click the Add button in the main window. If you do not do this your newly created filter is not saved. You will get a warning if you try and then click the Continue Editing and then click the Add button.
Your filter is complete. You can test this by click the Tools menu and selecting Filter All Messages in Folder. If your folder is set up correctly you will see the changes made instantly.
Final thoughts
Claws Mail filtering is a very powerful tool that will allow you to create very helpful filters to keep your Claws Mail organized and free from unwanted email.
Advertisement


They say that the CLAWS Filters are difficult to set up.
It’s not that it is difficult at all.
It’s just that the instructions are crap.
If you play around long enough you will get there – but it shouldn’t be this way at all.
I have problem with filter that make certain email move to certain folders automatically. But it doesn’t update inbox automatically. I have to click another folder and go back to inbox to see those emails disappear. Worst of all the email will land at the last email I read and that could be days ago. How can I have clawsmail automatically go to the latest email in inbox?
when I click “define”, my pc freezes and must be rebooted. why is this occurring?
Because I haven’t found a sollution for my question above on google. I tried it myself and it’s pretty easy.
So how to export and import ClawsMail filtering rules from one PC to another or from one account to some other?
All rules are stored in ~/.claws-mail/matcherrc
If you want to move all rules to another PC you can copy the whole profile directory ~/.claws-mail over to another PC or just the filter file ~/.claws-mail/matcherrc
If you need to copy filter form one account to another, open up ~/.claws-mail/matcherrc and copy the rules you want from one account to the other.
Each folder rules has it’s own section. Section is named as follows:
[#//]
So for example:
[#imap/mymail@account.org/INBOX/FromMyMom]
enabled rulename “mama” from matchcase “mama@mommaul.org” move “#imap/mymail@account.org/INBOX/FromMyMom”
enabled rulename “delete old” age_greater 365 delete
I hope this helps someone.
Cheers!
Aas.
Thanks a lot … For a long time I have been trying to do it …
Is there a way to export&import all filters, say from one account to another?
You can also bring up the “Create filter rule” menu, and many other options, by right clicking on the entry in the message list window.