Taking screenshots in Linux

So you've been reading about Linux on ghacks for a few months now and you've noticed plenty of screenshots or images of applications in action. Now it's time you found out just how those images are taken. No it's not magic, but in one instance it's ImageMagick. Actually there are a few ways to take screenshots in Linux, ranging from a simple keypress to a command line tool.
In this article you will learn how to take screenshots with the help of The Gimp, the GNOME menu, the Print Screen button, and ImageMagick. Each way has its advantages, so it'll be up to you to decide which method suits you best. With that said, lets' dive in head first.
ImageMagick
I wanted to start with this method because it can be a little flaky. The primary issue is that ImageMagick has trouble with Compiz. If you're not running Compiz, you won't have any issues with this method. Otherwise you'd be best served to skip down to The GIMP.
One of the benefits of this method is you can use it to grab screenshots automatically. You could even set up a cron job to take screen shots at specific times, or log into a machine remotely and snap a shot. I won't get into the "why" you would want to do this - decide that yourself.
The basic command for taking a snapshot with ImageMagick is:
import FILENAME.png
Pretty simple. The only catch with the above command is that you will have to specify what portion of the screen to grab. When you issue that command a cross-hair will appear which you click and drag to select what portion of the screen to grab. There is an easier way. If you want to take this screenshot without interaction you issue the command:
import -window root FILENAME.png
What the above command does is take a screenshot of the root window (that's the entire screen basically.) The screenshot will be saved (in the case of the example above) as FILENAME.png
Print screen
This one is simple (and not much different than using the GNOME menu) you press the Print Screen button. When you do a window will open (see Figure 1) asking you to give the file a name, decide on a destination, and click save. You can save the screenshot in .jpg, .png (default), .tiff, .gif, and .bmp formats. From this same window you can also copy the image to the clipboard for later use.
GNOME Menu
If you look in the Accessories subment of the GNOME Applications menu you will see the entry "Take Screenshot". If you click on this the same window will open that opened when you hit the Print Screen key. This works in the exact same way. If, for some reason, you have a different keyboard mapping or a Print Screen key that does not work, this menu entry is sure to work.
The GIMP
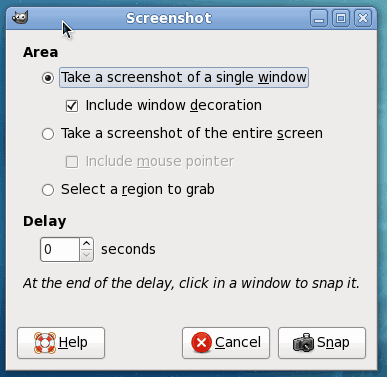
The GIMP is my standard means for snapping screenshots. Within The GIMP click on the File menu and then click on the Create submenu. From within the Create menu click the Screenshot entry which will open up the screenshot dialog (see Figure 1).
There are three types of screenshots you can take:
Single Window: This will grab only the window you click on after you click the Snap button.
Entire Screen: This will grab the entire screen after you click the Snap button.
Select a Region: This allows you to select the portion of the screen you want to grab after you click snap.
You can also configure a delay (in seconds) which will allow you to open up menus or take an action to grab.
When using The GIMP for screenshots you will have to save the image manually. But you can also edit the image before you save it.
Final thoughts
As you can see there are a number of ways to grab a screenshot in the Linux desktop. Each method is simple and should have you snagging screenshots all day long.
Advertisement


Ha ha ha… NOW in linux mint maya… you just press prnt scrn and go to pictures in documents the file wil be automatically saved !!!!
Maybe good additions to this list are the checklist of criteria for selecting a screen capture tool at http://www.indoition.com/screen-capture-tool-choosing.htm, as well as the list of screen capture tools at http://www.indoition.com/screen-capture-tools-survey.htm.
Shutter = GScrot. That’s what I use.
I simply press the print-screen button. This cause gnome-screenshot to popup which allows me to save the screenshot as an image or copy it to the clipboard. I don’t understand why this needs to be more difficult.
I’m using abscapture, it’s good because of the alpha channel grabber, so my screenshots preserve transparency and shadow.
http://dttvb.com/abscapture.html
Not only GIMP is capable of screenshotting single windows. You can do that with gnome, too. Just keep the ALT button pressed down when hitting the print button.
And if you’ve compiz enabled you should have a look at its screenshot plugin, which enables region-snapping (eg SUPER+Mouse1 and drag) (and automagically saves the output to a specified folder ;) ).
Just another way to take screenshots ^^
HaHaHa, in Linux _everything_ is complicated! You guys need a whole article on how to take screenshots? KDE can’t even take screenshots:
https://bugs.kde.org/show_bug.cgi?id=166608
Oh, sorry, there is an eight-step guide to taking a screenshot in KDE on that bug report… it can be done!
I use ksnapshot.
$ gnome-screenshot -d 5
also has it’s uses (assuming gnome as opposed to kde or other)
No love for scrot?
On my GIMP version (2.4.6), there is a submenu titled “Acquire” instead of “Create”.
I actually didn’t know about the option…learn something new every day. Thanks. I especially like the reduction of steps when editing a capture. I did find that the GIMP window stayed visible, but you can minimize the GIMP window without losing the capture dialog and that way you can capture all of another program’s screen without a problem.
Second the support of shutter as a screencap app for linux, best one I’ve found
Nice post!
Did you try Shutter? It’s a great piece of Software!
http://shutter-project.org/
Cheers,
Johannes