Installing and configuring VirtualBox for virtual OSes

The world of virtual OSes continues to grow and grow. If you never experienced a virtual OS you should know they are outstanding tools that will help you with many tasks. You can test various environments, you can run software you couldn't run before (i.e. games), you can run less stable OSes within more stable OSes. The limits almost seem boundless. And VirtualBox makes tackling virtual OSes not only easy, but free.
VirtualBox is easy to install - as easy as any other Linux application found within your distributions' repositories. For this article we will be using Ubuntu Desktop 9.04. There will be no need to add any repository information.
Installing VirtualBox
As already stated, you will find VirtualBox within the repository of the Ubuntu distribution. So to install VirtualBox open up the Add/Remove Applications utility (found in the Applications menu), do a search for "virtualbox" (no quotes), select the correct results, and click the Apply to install the software.
After Virtualbox is installed there is one thing you must take care of. Without adding your user to the vboxusers group you will never be able to run VirtualBox as a standard user.
Adding the user to the group

This is actually quite easy. Go to the System menu and click on the Administration submenu. From that submenu select the Users and Groups entry. In the window that opens (see Figure 1) you will click the Manage Groups button. But before you click that button select a user and then click the Unlock button. This will give you administrative rights for this tool (you will have to enter your user password).
When this new window opens scroll all the way down until you see the vboxusers group. Select that group and then click
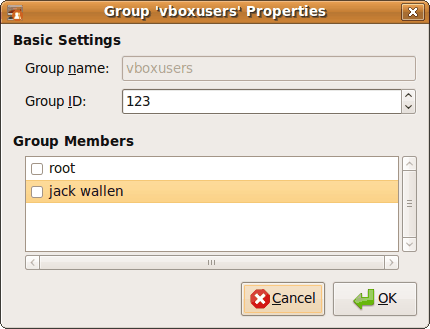
Properties. In this new window (see Figure 2) select the user you want to add to the group and then select OK.
You can now close out the Groups and the Users tools. You are ready to start using Virtualbox.
Starting VirtualBox
You will find the VirtualBox listing in the Accessories submenu of the Applications menu. Click on that and VirtualBox will start.
Before you can actually start installing a virtual machine you have to take care of some administrative tasks. Never fear, though, this is all handled by a very easy to use Wizard that will walk you through every step of the way. The only instance you might get tripped up is Virtual Hard

Disk step. Before VirtualBox can install an OS it has to have a virtual hard drive. This will happen around step 4 of the wizard (see Figure 3). In order to create a new virtual hard drive you have to click the New button. This will then take you into a completely different wizard. Again, this wizard is very simple and walks you through step by step.
Once you have created a virtual hard drive you will be taken back to the same screen as you were in for step 4. The only difference is your virtual hard drive will now be listed. You can now click Next to move on. The final screen will give you all of the information you have configured and you can then click Finish.
You are now ready to create a virtual machine. In my next article we will discuss the process of of creating a virtual machine.
Final thoughts
VirtualBox is an outstanding tool with almost limitless possibility for any administrator, developer, or computer user. It's simplicity is only outshined by its possibilities.
Advertisement


Don: That is correct. If you want USB support you do have to download the non-free version of VirtualBox. And that is interesting about the caps in the command. On both my Ubuntu and my Debian install the command was installed as both VirtualBox and virtualbox. I have executed it as both.
On my system, a launcher menu item was not automatically created. It can be launched from the command line with “VirtualBox”. Note the capital “V” and “B”. Knowing that, I manually entered a menu item via System>Preferences>Main Menu.
Also, it should be noted that there are two versions of VirtualBox in the repositories. One is open source (OSE), the other is not. I have read, but not proven to myself, that if you want USB support you’ll need to install the non-OSE version.
I did not know about this untl today. I say thank you since I installed the VirtualBox PUEL a few days ago to be able to use USB. Everything except the USB worked until I added the user to the virtualbox-group.