Using Layers in The GIMP

In my last GIMP article ("Create a 3D logo with The GIMP") you learned how to make 3D logos that can easily be used for web projects and more. In the process of making those logos I mentioned deleting a layer which sort of jumped ahead of the game. So I thought I would jump back in time a bit and retroactively illustrate how to deal with layers in The GIMP.
What are layers you ask? Image layers are like stacking transparent sheets on top of one another. You can create images on each layer and still see the layers underneath. Let me give you a simple example.

Layers tool
Figure 1 shows the tool which allows you to work with layers. If you need help getting used to The GIMPs interface, check out my "Getting to know The GIMP Interface" article. When you create a new image in The GIMP you automatically create the Background layer. If your image is flat (no layers) the only layer you will have is the Background layer. You can, effectively, work on this layer alone, but you won't have nearly the flexibility you would with layers.
Background layer
When using layers the background layer, as you might think, is the base layer for your image. As stated earlier this this will be the default layer when you create a new image. Figure 1 shows this layer listed in the layer window.
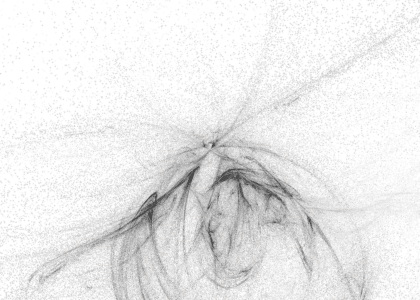
Figure 2 shows our background layer. This layer was created with a nifty GIMP filter called Flame. This filter can be found in the Filters menu under Render and then Nature.
In the layers window (Figure 1) you can see there is a tiny thumbnail of this layer shown. Now that we have our background layer done we will add something on top of that. Working with what we did in the previous article, let's add a logo on top of this.
The first thing you need to do is add a new layer to what you already have. Click the New Layer button to open up a small window. This window will ask require you to configure a few options. These options are:
- Layer name: Give your new layer a name that will help you quickly know what this layer is.
- Width/Height: You can specify the size of this layer. Most always you will work with the same size layer as your background layer.
- Layer Fill Type: If you are wanting to see what is behind this layer, you will need to chose Transparency. This will be your choice most of the time.
With everything configured, click OK. Back in the main image window you won't notice any difference. In the layers window you will see a new layer added.To work with this new layer you will click on the new layer. Whatever you do in the new layer will not directly effect the background layer.
Working with your new layer
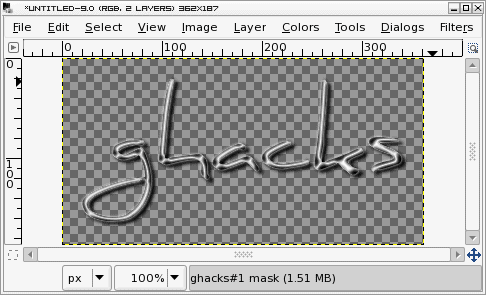
Just like you were shown in the previous article, create a logo. Once you have created your logo take a look at the logo Layers window. You should see multiple layers in this window. What we are going to do is copy and paste our logo into our new transparent layer of our new image. To do this properly though we have to delete the background layer of the logo. If the background layer of the logo is not removed it will cover up the background layer of our new image. Figure 3 shows our logo with the background image removed. Now you will need to flatten the logo so it can be copied and pasted. Flattening the image merges all of the layers together. To flatten your logo you will need to click Ctrl-m and then click Merge. Now you can copy and paste the logo into the background.
Here are the steps to copy paste the logo into the new image layer.
- Go to the logo and click Ctrl-c
- Go to the new image (Make sure you are working on the new layer by selecting that layer from the Layers window) and click Ctrl-v
- Click on the move tool and move the pasted image to where you want it.
- Move your cursor around until you see an anchor and click your right mouse button to anchor the layer.
After you have anchored your new layer you can alter the opacity of the new layer by selecting the new layer and dragging the Opacity drag bar to the left or right. This comes in handy if you want to see more of the background image through the new image.
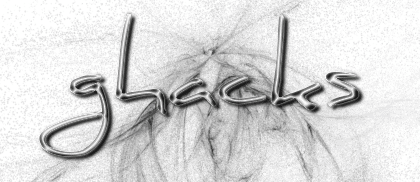
When the new layer is to your liking you can finish up your work on the image. For my example I am going to crop some of the image, flatten the image, and then save the image.
Figure 4 shows the final image.
Final thoughts
Although this was a very simplified example of using layers, you should now see how useful layers are. You should also have a working knowledge of how to work with layers. You can add as many layers as you like and get as creative as you need. The GIMP makes this easy.
Advertisement


so say want to take 3 pics from the same spot with a camera, so im in 3 different spots in the same room. Can iI layer it so that i can completely see all 3 of me? I keep try to do it but if I get all 3, im really faded out. How do I get around this?
Is it possible for you to explain in more detail how the Flame filter was configured to create the background shown here? I’d love to know how the exact effect was accomplished. Also, what font did you use to create the logo (I can’t find your tutorial that explains how it was created)?
Thanks.
Thanks for the GIMP tuts!
I find the few i’ve found online to be quite lacking, so more, please, more. :-)
Thanks for the tutorial! Would you be willing to write one that answers the question, “How do I make a layer 20% transparent?” I cannot figure this out.
opacity, click and drag