Backup your Linux, Mac, or Windows machines with fwbackups

Are you looking for a simple backup solution that will work cross platform, with a user-friendly interface, that's open source, and free? If so, you've found it. The fwbackups backup solution is all of that and more. I have tried many other backup solutions on Linux. Some of them are either command-line only, require a complex setup, or don't work. And then there is fwbackups.
This particular backup solution features: user-friendly graphical interface, cross-platform availability (Linux, Mac, and Windows), flexible backup configurations, backups can be stored nearly anywhere, entire computer backup, one time backups, scheduled backups, file/folder exclusion, and more.
Getting and installing
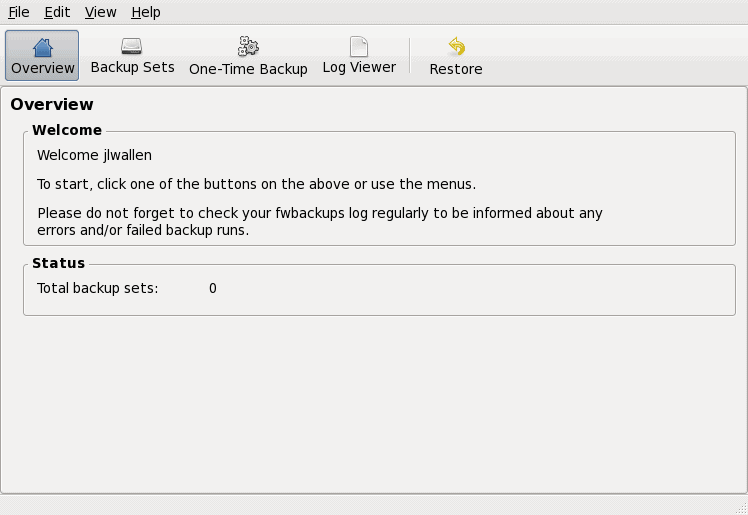
Even though fwbackups can work on multiple OSes, we're going to just illustrated installing and using on Linux. There is a simple way to install fwbackups because it will most likely be in the repository of your distribution. Open up your Add/Remove Software utility, do a search for fwbackups, select the results, and click apply. When the installation is complete you will find fwbackups in the Preferences sub menu of the System menu on the GNOME desktop. When you first start fwbackups you will see the main window.
The main window is comprised of five "tabs". The default tab is the Overiew tab which tells you how many backups you have done.
First Step

The first thing you need to do is add a set to your backup. Let's say you want to backup your ~/Documents directory. To do this click the New Set button to open up a new window where you configure this set. From this new window you can add either folders or files (you can add multiple files/folders to a single set).
You will also have to add a name to the backup. This is very obvious. In the Name field at the top of the window, enter the name you want to use for the backup.
From this same window (where you add files/folders) you configure the following:
Destination: Where do you want the backup to be stored. In Linux you can store this locally or on a remote server via ssh.

Times: If this is a scheduled backup when do you want it to occur. This is also where you configure the recurrance of the backup for this set.
Options (Simple): The majority of options for the backup set are here. You can configure the backup to be recursive, the format the backup will be in (tar, tar.gz, rsync, etc), how many old copies of the backups to keep, etc.
Options (Advanced): Here you can add commands to run before or after the backup. You can also change the nice value as well as what to exclude from the backup.
Once you have configured your backup set you can test the set by clicking the Backup Set Now button.
You can also do a One Time backup if you need to backup something just once. This set will not be saved to your sets.
Restore
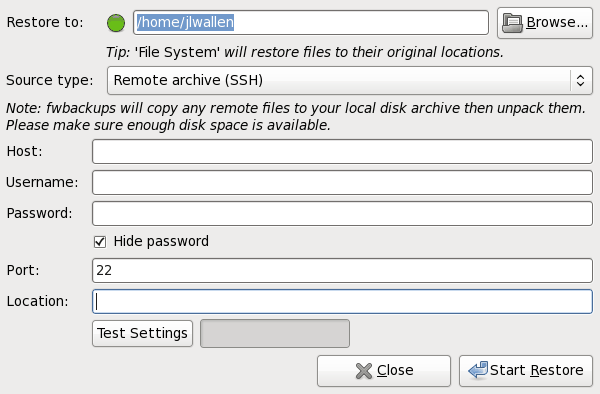
To restore a backup click the Restore button. Depending upon the type of restore you want to do (either locally or remotely) the settings will vary.
To do a remote restore you will use ssh (just like you use in the remote backup). The only downfall is you will have to know the explicite path to the backup file as you can not browse for the file when doing a remote restore.
Once you have everything configured, hit the Start Restore button to fire up your restore.
Final Thoughts
The fwbackups tool is one of the easiest backup utilities I have come across. If you have a need for a cross-platform backup utility fwbackups might very well be the tool to place in your toolkit.
Advertisement


Compiling is actually pretty easy on Mint. Here’s how to download and compile it on Linux Mint (and probably Ubuntu as well):
$ sudo apt-get install intltool
– This installs the latest version of intltool
$ wget http://downloads.diffingo.com/fwbackups/fwbackups-1.43.4.tar.bz2
– Download the source file
$ tar -xjf fwbackups-1.43.4.tar.bz2
– Extract it
$ cd fwbackups-1.43.4/
– move into the extracted directory. The compilers you will need were installed by default in my Linux Mint 11.
$ sudo ./configure
– The “configure” is the first step in compiling
$ sudo make
– “make” is the second step
$ sudo make install
– copies the compiled binary to your bin directory so you can run it just by typing the command
$ fwbackups
– This should launch the GUI and get you started! Hope this helps!
-Jordan
This backup solution looks great for my latest foray into Linux, specifically Linux Mint 6. However, I can’t find fwbackups in the ubuntu or mint repo’s, including multiverse, universe, etc. I prefer not to download and compile the source. Is there a repo where I can get this?