Bios Update Made Easy
Many users shy away from updating the computer bios of their motherboard probably because of the fear of damaging the motherboard irreparably. Methods have evolved in the last years and it is easier and safer to update the bios than it was five years ago.
The following article explains an easy and straightforward way of updating the computer bios. The main question that everyone should ask himself before updating the BIOS is if it is beneficiary to update the Bios. The article takes a look at finding that out as well. The phrase "never change a running system" has some truth to it but it is still a good idea to check for new Bios versions every now and then.
It does make sense to check for Bios updates before upgrading computer components. New Bios versions can add support for faster processors, computer memory, lower temperaturs and even add new features.
Step 1: Identifying the Bios
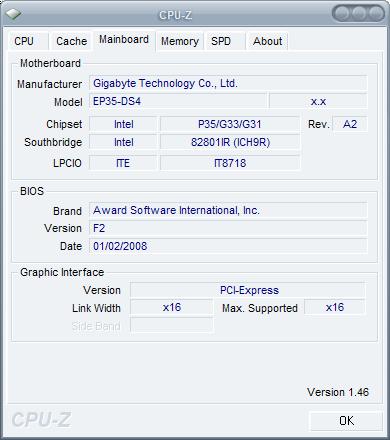
Probably the most important step in the Bios updating process is to identify the current motherboard and Bios version properly. The easiest way would be to check a receipt or motherboard manual if one was provided with the computer. If that's long gone you can try software like cpu-z to find out about your motherboard and Bios.
The Mainboard tab contains the information about the motherboard and Bios. Important are the motherboard manufacturer, the motherboard model and the Bios version.
Cpu-Z supports many motherboards but not all. If your motherboard cannot be identified you need to check the post screen during boot. That's the first screen that is being displayed. Hit the pause key after the computer memory is shown and you should find information about the computer Bios as well.
Step 2: Checking for Bios Updates
With the information gathered in step 1 it is now possible to visit the manufacturer's website and see if new Bios versions are available. The computer manufacturer above is Gigabyte and the motherboard is the EP35-ds4. A good start would be to enter the name of the manufacturer followed by the motherboard model into a search engine.
That usually leads straight to the page dedicated to the motherboard model. The Bios version shown in the screenshot above was F2, a check on the Gigabyte EP35-DS4 website shows that the latest Bios version is F5. Most manufacturers display information about changes and additions that have been introduced with each new Bios version. In this case support for the Update CPU ID Intel Yorkfield QX9770 CPU has been added as well as a fix for an ICH9R RAID issue.
After identifying the Bios updates it would now be time to make a decision if the update would be useful. In the case of the above Bios it would be useful if the ICH9R Raid was used in the current configuration or if the user had plans to build in the Intel Yorkfield QX9770 CPU.
Step 3: Updating the Bios
Step 3 is the actual update process. Every motherboard manufacturer has his own way and software to update the Bios. Methods range from booting to DOS, to updates directly in Windows to updates in the Bios itself.
In the case of the Gigabyte Bios the Bios was provided with a Dos executable and a batch file. A boot disk would have to be created and the files placed on it. Other manufacturers are offering applications that update the Bios from within Windows which is more comfortable obviously.
The best way is to search the manufacturer's website for information on how to apply the Bios update. It's always a good idea to backup the old Bios before applying the new one. That option is usually offered in the software that updates the Bios.
Advertisement
